Tuesday, May 31, 2011

Those Delicious Biscuits from that Place You Get Seafood


*which shall not be named*

You know those delicious cheddar biscuits from that seafood chain restaurant that you don’t admit going to? That place where you go to devour massive amounts of mediocre seafood, but in truth really get most excited about the prospect of devouring several of those cheddar biscuits?

Yeah, I don’t know anything about that, because I obviously don’t go there. EVER.  But I’ve heard *cough*cough* that these cheddar biscuits are an experience onto themselves. Warm, cheesy, bacony- delicious!  ENDLESS. Oh wait, I think endless bread happens at another chain restaurant.  But you wish you had an endless supply of those biscuits right?  Well, now you can!  I’ve discovered a recipe that pretty much mimics that biscuit experience to a T.

If you are like me, us Northerner folk have been at a disadvantage when it comes to biscuits.  I’ll be honest, growing up the only biscuit I’ve ever experienced came from a can and while I always enjoyed the novelty of peeling the paper off the can and it popping open, the biscuit itself kind of fell flat.  I didn’t experience an excellent fresh from scratch buttermilk biscuit until I had made a few visits to the South.  It was then that I realized we were missing out because, quite frankly, biscuits are not hard to make and the finished result is impressive.  Pop a few biscuits into a picnic basket, make a batch to take to a dinner party, pull the biscuit card when you have guests over for brunch, they will think you have unlocked a “domestic diva badge” and bestow great gifts of magic & healing onto thee.  Okay, maybe not gifts of magic, but I’m sure they will be impressed.  Try a breakfast sandwich using this recipe, throw some Canadian bacon or a sausage patty on there and a smear of preserves, it will blow your own mind.  But enough talk, right? Let’s get on with the biscuits. This recipe involves no yeast, minimal kneading (over working the dough results in a tough biscuit) and easy to find ingredients.  I’m really generous with the serving sizes because don’t you want a lovely, substantial biscuit?

Ingredients
Makes About 12 Large Biscuits

7 Slices of Bacon
3 Cups of Flour
3 Tablespoons Sugar
4 Teaspoons Baking Powder
1 ½ Teaspoons of Salt
1 Teaspoon Baking Soda
1 ½ Sticks of Cold Unsalted Butter cut into pieces
1 ½ Cups Shredded Cheddar Cheese
¼ Cup Chopped Fresh Chives
1 Cup of Buttermilk

Directions

Preheat the oven to 425 degrees. Line a baking sheet with parchment paper or spray liberally with cooking spray.

In a heavy skillet over medium-high heat, cook the bacon until crisp and brown. Transfer to paper towels and drain. Chop and set aside.

Whisk your dry ingredients together- the flour, sugar, baking powder, salt, and baking soda in a large mixing bowl.  Using your fingertips incorporate the chilled butter into the dry ingredients until the mixture resembles coarse meal. Add the cheddar cheese, chives, and cooked bacon. Mix to distribute the ingredients evenly.


 Add the buttermilk and stir just until moistened. Using 1/2 cup dough for each biscuit (or a good handful), drop the biscuits onto the prepared baking sheet, spacing the mounds about 2-inches apart.

Bake the biscuits until they are golden brown on top, about 15 to 20 minutes. Serve the biscuits warm with melted butter and enjoy instant biscuit bliss.


Thursday, May 19, 2011

Pizza Time!

Pizza time is somewhat like t-shirt time, but less testosterone fueled and more delicious!  If you haven’t gathered anything from this blog, the number one takeaway is that I value convenience.  I’m sure you do too.  Quick, easy and delicious- it’s possible to have all three!  I’ve spoken previously about the convenience of store-bought pizza dough here.  In the tri-state area, you can pick it up almost at any supermarket or Italian specialty grocer.  99 cents to $1.50 will get you a pound of raw pizza dough so that you don’t have to worry about yeast or resting time.  I buy a few at a time and freeze them, they defrost perfectly, just put them in the fridge the morning before you want to use them.  Also, I’ve found that the defrosted dough is easier to manipulate and doesn’t spring back as much, this is probably because the gluten has had more than ample time to rest, so it all works out to my favor.  I like to use a bit of parchment paper when making pizza (or roasting vegetables), it virtually eliminates cleanup time and prevents the pizza from sticking to the pan. You can also use cooking spray to prevent the pizza from sticking if you don’t have parchment paper in the house. 

With pizza I really love to experiment & try out different combinations beyond pepperoni, cheese and sauce.  I’ve made a delicious Thai chicken peanut sauce pizza that was truly kickass (I’ll share that recipe soon) and lots of variations of spring pizzas with different cheese combinations.  I don’t own a pizza stone or a pizza oven even though most people swear by them.  My father has a pizza oven and I'm convinced the thing just complicates matters as it seems to take HIM about an hour and a half to make a pizza.  I just stretch and roll out my dough (with a rolling pin for a nice thin crust) onto a cookie sheet, cover with toppings and bake at a high heat.  The below recipe is a fantastic potato, pepperoni & broccoli rabe with manchego cheese variation.  It requires a pre-cook with the potatoes but it’s still fast and easy.  The manchego cheese lends a lovely nutty flavor that compliments the potatoes perfectly.  The flavor result is similar to truffle, I swear!   A few words about this recipe- be sure to season each of your layers.  Be liberal with your seasoning here.  Any chef will tell you how important seasoning each element/layer of your dish for the best possible result.

Pepperoni, Potato, Manchego, Broccoli Rabe Pizza
Serves 4 Normal Folk or Two Who LOVE to Eat

2 Yukon Gold Potatoes- thinly sliced (get that mandolin out!)
1 Purple Onion- also thinly sliced
2 Tablespoons of Olive Oil
Salt & Pepper
½ Bunch of Broccoli Rabe, stems trimmed and cut into 1 ½ inch pieces
3 Ounces of Pepperoni (or however much you like)
6 Ounces of shredded Manchego Cheese

Preheat your oven to 500 °, with your rack in the middle (important, so that that your crust does not burn).  Roll your dough into your desired shape. You might prefer a traditional 14 inch round or you may like to just free-form your pizza as I do, creating a lovely long, rectangular shape that fits on my baking sheet. In a large bowl toss potatoes and onions with two tablespoons of olive oil , salt and pepper (be liberal!).  Arrange your potatoes neatly onto your dough and top with onions, leaving room for a bit of a pizza border ¾ of an inch. Brush your borders with a bit of olive oil and bake for five minutes.


In your same bowl, toss your broccoli rabe with another two tablespoons of olive oil and season with salt & pepper. Remove pizza from the oven and top with broccoli rabe and pepperoni.  Return to the oven and allow to bake for an additional 5 minutes, rotating halfway. 


After 5 minutes remove pizza from oven and cover with your shredded manchego cheese. Bake until cheese is melted and crust is golden brown 3-4 minutes.  Enjoy!!


*Recipe adapted from Everyday Food 

Wednesday, May 11, 2011

Meaty Mac Attack!

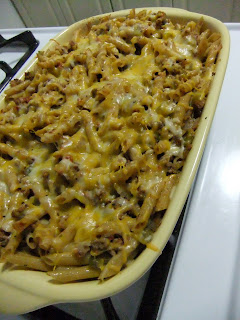
I don’t know about you but when speaking of myself, there are two things I am most certain about when it comes to food:  I like Mac N Cheese and I like chili.  So, it’s only natural that I as well as others would try to combine the two to create one supreme, one-pot meal.  I’ve tried a variety of meaty mac recipes and I keep coming back to this one.  It combines well-seasoned ground beef with pasta and cheese for a result that is pretty damn good.  Pasta bakes are a really great option for when you don’t want to slave over a multi-course meal- you just throw everything together into a baking dish, top with cheese and bake!  Your meal is done quickly and covers most food groups.  I’ve baked everything from roasted vegetables with my pasta to variations of pesto pasta with a crunchy topping, traditional mac ‘n cheese & even tortellini with sauce and additional cheese piled on top! The end result of a pasta bake is a transcendent experience:  melty, delicious and hearty!

I’ve been cooking the below Meaty Mac recipe for a good 10 years now.  The recipe is quick, taking under 30 minutes from start to finish to prepare and cook. The added bonus with any pasta bake recipe is copious amounts of leftovers, which I then bring to work with me or eat later in the week. Pasta bakes= cook now & eat for the rest of the week!

Meaty Mac
Makes: 8-10 servings
1 pound box of elbow macaroni (or rotini, penne or WHATEVER you have)
2 tablespoons vegetable oil
2 cups chopped green bell pepper
2 cups of diced onion
1 to 2 tablespoons chopped garlic (depending on your affinity towards garlic, mine is high)
2 pounds of lean ground beef (80% or better)
3 cups canned crushed tomatoes
Pepper to taste
1 teaspoon each of dried basil, ground cumin, oregano & salt
2-3 cups of grated cheddar

Heat oven to 350 degrees

Cook the macaroni according to package directions, drain and set aside.  Heat the oil in a deep skillet.  Add the peppers, onion and garlic and sauté until soft. Add the ground beef and sauté until browned. Skim or drain some of the fat out of the pot that comes from the beef. Add the tomatoes, salt and pepper, basil, cumin, oregano and salt. Once the beef is cooked and spices are well combined, transfer the beef and pasta into a 9x13 baking dish. Mix well to incorporate beef mixture throughout the pasta and top with the cheese. Bake for 20-25 minutes or until the cheese is slightly browned and bubbly.  Allow to cool for 10 minutes prior to serving.  Top with sour cream and enjoy!


Saturday, May 7, 2011

A Little Kitchen Workhorse

I’m a big fan of anything that makes prep work faster & easier and I’m sure you are too.  Our lives are busier than ever, whether your responsibilities include a stressful job, children or just worklife balance- it’s always best to find those little kitchen tools that serve as the workhorses.  Personally, I’m always on the lookout for items that serve multiple purposes.  How many times have you opened your kitchen “junk drawer” and the thing is just LOADED with stuff? Or can you even open it? Mine is so jammed that my measuring cups prevent me from fully opening it!  A tool for zesting, a tool for juicing, measuring spoons, cups, vegetable peelers, pizza cutters… the list goes on!  So, in my quest to make perfect fresh zucchini ribbons a few years ago, I had tried a few methods with little success. I mean, my vegetable peeler worked, but the pieces seemed, I don’t know, kind of short and chunky.

I set out to look for a mandoline. Since at the time, I was working across the street from Crate & Barrel I decided to go check it out. They had ONE mandoline and here’s the kicker, it was $200!! It was huge, stainless steel with numerous blade attachments and a giant finger guard. I needed it, but I didn’t need it for $200, plus I had some space constraints living in my tiny apartment.  So, I went without a mandoline for a few years until I discovered a jewel in a small Asian grocer, THE JAPANESE BENRINER!! 


This madoline is small & compact, easy to clean, easy to use, no electricity necessary (buh-bye food processor) cheap and comes with extra blades for a variety of dicing & julienning styles. Its also sharp as hell, the blades made of carbon steel so it is best to use the finger guard it comes with.  I myself am guilty of not using the finger guard, but I’ll throw away that last bit of whatever I’m slicing to save my finger tips! I definitely am not interesting is slicing away a bit of my index finger with my fingerling potatoes! No pressure is necessary as you glide the food over the blade, the Benriner pretty much does all the work for you. 

As with any cutting implement, be sure to wash and immediately dry your tool to prevent the blade from dulling.  The main blade on the Benriner is permanently attached and you basically adjust the cutting surface on the back with a screw to vary the thickness of your slices.  If you want to julienne or would like to fancy up your salad with carrot or cucumber sticks, you then would screw in one of the special blade attachments.  


I’ve sliced up everything from cabbage for slaw to potatoes for pizza (yeah, potatoes on pizza are awesome non-believer!) and perfectly sliced radishes for salads. This mandoline is truly fantastic. I paid $15 for mine, it’s the 2 ½ inch sliding surface and it’s available at Asian grocers or on Amazon.com


There are a few size options and you may also want to consider purchasing some Kevlar gloves with yours if you might find the finger guard awkward to use. Grab this guy if you love ease & convenience.  And By the way, the "benri" part of "benriner" apparently comes from the Japanese word for "useful" but a more accurate translation would be “convenient, isn’t it?” It definitely is!!